| Photo #1: Mesh stapled to 1x2 uprights |

|
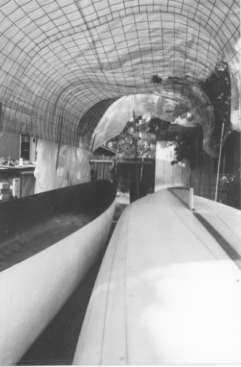
| Photo #2: The finished structure from the inside |
|
There appears to be some interest in how I acquired my steamboat, so here's how it's done.
First of all, if, like me you live in an area where boatbuilding is not common, I suggest you start by hanging around surf shops and in particular, places where surfboards and wind surfers are made and repaired. Get to know somebody there and consider hiring him or her to give you a hand. Even if you are familiar with fiberglas I still suggest that you hire a pro for the hard parts, just to make sure the boat doesn't come out catty-wompus and make left turns when the rudder is amidships. I was fortunate: my friend Tom Prothero made fiberglas diving helmets for a living and had made over 200 boats of both wood and fiberglas in his lifetime.
The basic construction method consists of building a form out of plywood, strip-planking this with polyurethane surfboard foam. After shaping, it is covered with a layer of fiberglas, then coated with mold release. The actual boat will be laid-up from fiberglas, on top of this form.
A temporary shelter:
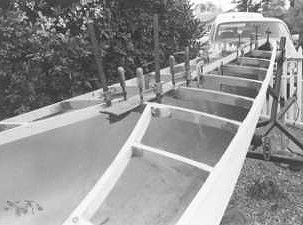
If the boat you plan to build won't fit into your garage, you'll have to construct one, preferably in a backyard where unauthorized bozos won't be able to crash into the flimsy structure all the time. The structure I made is based on one designed by George Greenough, which he used as a temporary living space while building his pyramid-shaped home in New Zealand. It is fairly wind-resistant if built close to the ground, but the one I propose is higher and if winds are anticipated, it must be guyed and staked like a tent.
I supported my structure on pairs of 8ft. tall 1x2's spaced every 8ft. of boat length and approximately 14ft. apart, side-to-side. Sharpen one end of these sticks and pound them in to the ground, so that the flat sides of each pair face one another. Eight of these stick support a "roof" that is 14ft. wide and 32ft. long: plenty big enough for most projects. Once these sticks are in place, go to the lumber yard and buy an 8ft. wide roll of 8gauge 6"x6" wire mesh. A roll is about 200ft. long, so arrange when you are buying the stuff to get credit for the unused portion: most stores will let you do this. Now, with the help of at least one and preferably two friends, cut the mesh into lengths which will dome over the upright 1x2's and hang down a foot or two from the top of the 1x2's (use bolt cutters to cut the stuff). Don't try to cut the stuff short and make a flat roof, as it will sag and require supports that there won't be room for. With a semi-circular domed shape to the mesh, you can use pieces of twine tied between the tops of the 1x2's, as well as shorter pieces of twine higher in the arch to hold the dome in tension, but that comes later. First attach both corners of one end of one piece of the mesh to the 1x2's, using an air-powered stapler (get a friend to back up the top of the wobbly 1x2 with a hunk of heavy wood while you do this).Once this end is fastened securely, hoist the free end of the mesh onto the tops of the opposite pair of 1x2's and fasten it there as well. Now that the mesh is fastened, tension it with strategically-located twine, until the mesh stays in a semi-circle. Once the structure is up, cover it with those cheap blue plastic tarps (don't use transparent or black plastic: it will get too hot inside), put stakes around the perimeter, guy the tops of the posts to the ground for added stiffness and you're ready to go.
| Photo #1: Mesh stapled to 1x2 uprights |
|
| Photo #2: The finished structure from the inside |
|
For mold and hull, you will need:
-1/2" plywood for mold bulkheads (figure on one for every 2ft. of boat length, plus one for the transom.
-1"x3" or 1"x4" construction grade Douglas Fir for supporting the mold at a convenient height (figure on 12 ft. of wood for every bulkhead).
-1"x2ft.x8ft. sheets of polyurethane surfboard foam, available at surfboard shops or possibly through industrial wholesalers (look in the Yellow Pages). To bond the polyurethane foam pieces together, I suggest a Weller hot glue gun: the kind with a trigger on it or the kind that lets you push the sticks through from the back. Do not get the kind which needs to be pushed against the work to make the goo come out, as the foam is too soft for this and too small a quantity of glue is dispensed.
-Fiberglas cloth: use 6 oz. or 8 oz. cloth. You'll need the better portion of a full roll for a boat about 20ft. long, so save money and buy in bulk.
-Polyester resin: get the stuff called "laminating resin". There are three kinds of polyester resin: laminating, surfacing and casting resin. Never use casting resin! Use laminating until the very last coat; then use surfacing resin, which will give a hard, dry coating, good for holding paint.
-Mold Release: Get Partall Film #10, a fast-drying, water-soluble compound that you can apply with a spray gun. For any touch-ups that are needed, it can be painted on with a brush (Partall can be ordered from Rexco Corp., P.O.Box 4430, Santa Barbara, CA 93140).
-Surfacing Agent: This is the stuff you add to laminating resin, in order to make it surfacing resin.
-Catalyst: The chemical name is "methyl ethyl ketone peroxide"; this stuff is very dangerous! In addition to being flammable, it will destroy your eyes if you get splashed: water won't wash it out WEAR SAFETY GLASSES
Miscellaneous items and tools:
-Acetone for solvent (or vinegar if you can't get acetone anymore) for solvent, woodworking tools to cut foam and wood pieces, felt tip pen with a sharp point, hand drill, hand saw or a jig saw, radial arm or table saw, trim knife and blades, a very good pair of shears or leather cutting scissors to cut fiberglas cloth, chalk-line and a ball of carpenter's twine (the smooth stuff, not the brown hairy stuff), rubber gloves (get the disposable latex gloves that come in boxes of 100), a forced ventilation system if you are working indoors, a means of keeping the entire project out of direct sunlight if you are working out-of-doors, LOTS of clamps (figure 4 per bulkhead plus some spares), a respirator, disposable paper cups and tubs, brushes, rollers, etc.
Building the Mold:
One little detail to keep in mind: since the mold is to be covered with 1" thick foam, the bulkheads you make must be 1" thinner on all edges save the top, otherwise the boat that is layed up on this form will have a draft 1" greater and a beam 2" wider than you had planned!
Make bulkheads out of 1/2in. plywood, first drawing a vertical centerline and a crossing horizontal line on all pieces, using a fine point felt tip pen or a chalk-line (see sketch for a typical situation) For convenience and uniformity, place the horizontal line either at a fixed distance from the keel (if the keel is flat) or at an estimated waterline. Now drill a 1in. dia. hole through the intersection of the lines in all of the bulkheads. To line the bulkheads up, clamp a frame of 1x3's on the same side of each one of the bulkheads, to hold them upside-down and fairly straight (see next drawing). Only clamp the frame; don't nail to the bulkheads yet, so that adjustments may be made to square up the whole assembly. To keep things from coming apart and falling forward or aft, a keel of some sort will be necessary. We used a piece of 2"x2" redwood (but any sufficiently long, straight-grain wood would do) and nailed it to the bulkheads. Here it is best to pre-drill a slightly undersized hole in the keel, so that nails may be pulled out and re-hammered if repositioning is necessary. Once all the bulkheads are supported in a more or less orderly fashion, run a piece of carpenter's twine through all of the drilled holes, fasten it taut and use this as a guide for precise alignment. When everything is squared up to perfection, nail all clamped intersections in place and planking can begin.
|
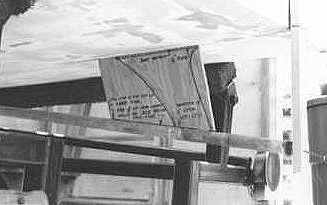
Drawing #1: A typical bulkhead. Tom cut more notches later for added fore-and-aft
1"x 2" stringers |
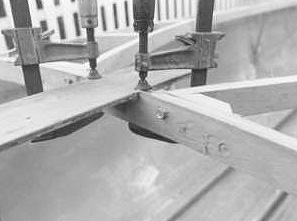
Drawing#2: Bulkhead supporting structure: clamps first; permanent fasteners after alignment. |

Fairing the mold
Once planking of the mold is completed, you will no doubt notice lots of wavy spots, lumps and dents. The major ones can be dealt with by shimming between the planks and the bulkheads with bits of foam, held in place with a dab of hot glue. If high spots are more than half the thickness of the planking and if there is a bulkhead there, it is advisable to take out the offending bulkhead and re-cut it, until the hull form is fair. If the high spots are between bulkheads, then a hand saw run lengthwise along the hull in that area should create a gap which (hopefully) will let the foam pop back into line. Another quick and dirty fix for a high spot is to hot glue a small piece of pre-cut wood (use a bandsaw to get the shape right) to the malformed hull area, then fasten a stout bit of twine to the wood, pound a stake in the ground and tension the line until the hull is fair. Once the foam appears to be roughly O.K., it can be sanded smooth with a Stanley Shurform, followed by 80 or 100 grit sandpaper (first glued to a piece of 1"x4"x4' aluminum channel for squareness and stiffness). Remember: the longer the sanding block, the more true the resulting shape. As for symmetry, the best tool is your eye and good lighting: if you are working outdoors, try to make all of your observations at a time when the sun is directly overhead or when the lighting is uniform everywhere, i.e. overcast. It's amazing how wrong you can go if the hull is brighter on one side than on the other!
With the foam sanded smooth and any remaining low spots, dips and nicks filled with Bondo, it is time to decide whether you want one boat or many boats. If you only want one hull and plan to destroy the mold, get a few cases of 2" wide plastic strapping tape or better yet, vinyl tape (like the stuff used by electricians) from the building supply and proceed to tape the entire mold. To get good adhesion, vacuum the foam first to remove all excess foam dust just before taping. The best pattern to lay on the tape starts at the keel and goes diagonally down towards the "deck". Try to angle the tape back 30 to 45 degrees from the vertical. With luck the tape will act as a barrier to keep polyester resin from sticking to the mold. If you are in doubt as to the effectiveness of your taping job, apply another layer of tape on top of the first one, but with strips placed at 90 degrees to the first layer. Again, start at the keel and work down towards the "deck".
If you want to have a reusable mold, vacuum or blow off the bare foam after all the high and low spots have been taken care of, and then with the help of your friendly neighborhood fiberglassing expert, roll out a layer of cloth onto the mold and apply resin to it. Using rollers and squeegees, it is possible to work the cloth until there are no wrinkles, even in difficult spots, but an expert's touch is essential: any wrinkles which are left behind mean a lumpy hull interior and worse: difficulty in removing the hull from the mold. Don't forget to deal with any sags and "stalagmites" before the resin gels: these little spikes can be really sharp if left to cure. When the resin has cured enough so that cutting the fiberglas with the trim knife doesn't pull the cloth out of place, don't forget to trim the ragged cloth ends back to the lower edge of the 1"x2" wood strips at the bottom of the bulkheads. Once this layer of cloth has fully cured, check again for fairness, lumps and dents and again use Bondo where indicated or get out the power sander and take down the high spots, but BE CAREFUL: you don't want to sand through the cloth!
The next thing to do is to spray or brush on a coat of mold release. When this has cured and a careful inspection reveals no flaws in it, the actual laying up of a fiberglas hull can begin. Remember that a properly designed permanent mold can have no overhang or tumblehome in it: otherwise the laid-up hull can't be popped off. Otherwise you're in for a session with crowbars and chisels at mold separation time!
Building the Hull:
Now, the actual procedure of laying up I will leave to the experts, as this involves careful calculation in ratio of catalyst to resin, depending on the weather and it is still more art than science. Like I said before, get a local "guru" to minimize your troubles. A few things worth noting:
-Use a fan if ventilation is poor or even if ventilation appears good but there is no wind.
-As layers of cloth are laid down one atop the other, you want to avoid wrinkles at all cost: they can cause leaks and structural problems later on.
-Avoid patches of sunlight and patches of shadow on the hull: this will cause unequal cure rates for different parts of the layup. Avoid direct sunlight to increase the odds of success.
-Keep a bucket of acetone or vinegar handy and open so that gooey fingers and hand tools can be dunked periodically during extended lay-ups. The last thing you want to have to do is unscrew a cap from a can while your hands are gooey!
-Avoid fiberglas matte if possible: it's good for filling voids and corners, but it is useless as a structural material. Also, its crumbly weave causes it to fly apart easily and get into everything, making a real mess.
-Avoid round sterns: they look nice and they are easy to mold in fiberglas, but they are very difficult to get right in foam.
-Get a couple of 6ft. ladders and an old piece of 1" or 2" dia. pipe, about 10ft. long. Put the roll of fiberglas cloth over the pipe and put each end of the pipe on a ladder at the end of the keel. Now cloth may be rolled out along the length of the hull with ease.
-Buy resin in 5 gallon drums and buy cloth in rolls and DO NOT get them retail at the local hardware store. Get them from someone who uses the stuff all the time to insure that the resin is fresh: it get lumpy if it sits on the shelf too long. Resin can go bad in as little as 6 months if stored improperly.
-Batches of resin vary, so buy all you need at one time and test it before you commit to something major.
-If your hull has a large flat section in it, try to cut cloth so that it overlaps in this area, giving an additional thickness of cloth there. Alternatively, when the hull is removed from the mold, add a stiffener on the inside of the hull in these weak or floppy areas, to increase stiffness and to insure that the hull form won't flex too much there. If you are into good looks, these stiffeners can be custom shaped from pretty pieces of wood and covered with a layer of fiberglas, but if you're in a hurry or if the stiffeners won't show, use unidirectional fiberglas rope wetted out in resin and just lay it where you want it, squish it into the shape you want with your fingers and leave it alone until it cures. Sand off any spikes and give it a coat of surfacing resin to finish the job.
-Avoid leaving large quantities of catalyzed resin in paper or glass containers, as the heat generated in the curing process can crack glass or ignite a paper container. If you ever see a hot batch of resin crackling and smoking, pick it up and put it in a bucket of water for safety.
-After sufficient layers have been added to give a hull thickness that is adequate (at least 1/8", or maybe 10 layers of cloth) and it has had time to cure, it's time to apply a coat of surfacing resin.
Finishing hull exterior:
Now that you have finished laying up the hull on the mold and the fiberglas has had two or three days to cure, lay on a final coat of surfacing resin. Use a really good quality brush: DO NOT use one of those disposable one: they leave hairs all over the place! Inspect for irregularities in the shape one last time. High spots are sanded as usual and low spots, if not too low, may be filled by brushing a few coats of surfacing resin in the area. For larger irregularities, one trick is to mix a small amount of Bondo into the resin to increase its viscosity, so that it won't be as runny. When the hull is smooth, lightly brush on a final coat of surfacing resin. When this is cured, wet sand the hull smooth with 360 grit sandpaper, held on a stiff sponge or a block of something soft and flexible. A power disk sander with a soft pad attachment is ideal. Keep moving and never work in one small spot. Walk along beside the boat while you work, to help distribute the sanding more evenly. Get a friend to dribble water from a garden hose ahead of where you are working. Since you are using an electrical appliance around standing water, be particularly careful and wear rubber boots, too. Let the hull is dry and then wipe it free of any sanding dust with a tack cloth. Finally, spray it with either Gelcoat or the kind of automotive paint which requires a catalyst (use acrylics or epoxy, not the lacquers) and apply at least 3 coats.
Here's another trick: when it is time to paint waterlines, etc. don't use ordinary masking tape. Instead use 3M brand trim tape, the green stretchy stuff: it costs a little more, but the results are worth every penny. While the paint is curing, prepare a cradle out of plywood, or better yet, have a boat trailer ready to accept the hull. Pay particular attention to the form of the supports, so that the "deckless" and therefore flimsy hull won't deform once placed upright. As you did earlier, use cardboard or thin plywood to make templates and you will have a much better fit. cover your trailer or supporting structure with outdoor carpeting to protect the hull and make sure that the carpeting is fastened without any metal fasteners: use contact cement instead.
Separating hull and mold:
To remove the hull from the mold, first flip hull-and-mold right-side up (we used beanbag chairs on the lawn: these proved to support the complex assembly very well). Now, using wooden wedges, carefully make an opening between the hull and the mold at a point about midway along its length. Try to expand this crevice and lengthen it with more wedges. When you think you've got a large enough area opened, stuff a garden hose in the space and turn on the water. The green mold release, although impervious to resin and acetone, is water soluble and should quickly dissolve, separating the two components. The weight of water entering the space will cause the mold to "float" inside the hull. If there are any spots which are reluctant to release, try a few whacks with a rubber mallet, or try wooden wedges at that specific area. Also try going to a point opposite the sticky spot and give a couple of thumps from there. For instance, if the transom is stuck, lever the bow up and the stern may pop loose. My hull had a problem in the large flat area aft of the molded-in keel which was so stuck that we eventually drilled some ¼" holes at this point, inserted round wedges through these holes and generally beat the crap out of it to get it apart. This was acceptable damage, since a hole would eventually be cut at this location anyway, where the propeller shaft log would pass through the hull.
For those who have built a "one-off" mold, it can be separated from the hull much more easily. First remove all internal bulkheads. Once a crevice has again been wedged open amidships and a hose has been stuck in and turned on, the mold may simply be crunched to pieces and discarded. The trash man will have a fit, so be prepared to make a trip or two to the dump before the mess is cleaned up.
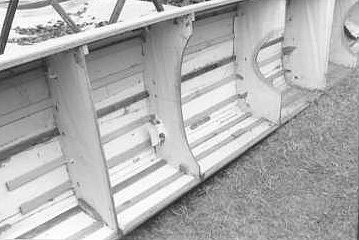
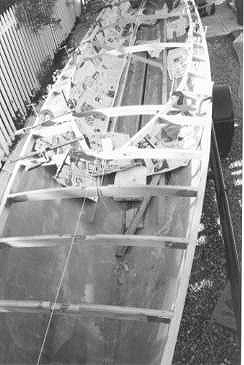
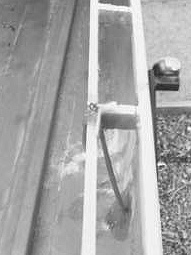
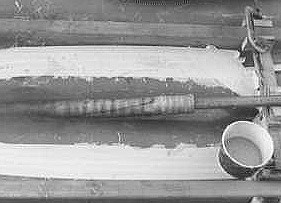
| Photo #3: A good shot of a (reusable) mold's interior, after removal of the supporting structure. Note additional stringers supporting the hull's flat aft section. | Photo #4: Hull and mold separated at last. Note small hole aft of skeg, made to pry apart a section that didn't come loose readily... |
|

|
Internal Stiffeners and Deck Framework
Now you have a completed, but extremely floppy hull. The next thing to do is to cut a wooden perimeter for the hull which will stiffen it, finalize its shape and its beam and which will act as a surface for attaching deck, fittings, mooring cleats and coaming. The best way to do this is in three separate sections: the bow, the stern and the sides, or rails. First make up some bow and stern stiffeners, (using plywood or 1x2s with gussets hanging down from each end to confine the spreading hull) and temporarily clamp them in place. Adjust them until the hull has a shape that is "fair", or pleasing to the eye.
Assuming the beam of your boat is less than 8ft., for the bow and stern, get a full sheet of ¼" plywood (or 1/8" if available) and lay it on top of the hull as evenly as possible (snap a few chalk lines on it to aid in alignment and for taking measurements). Once aligned, crawl underneath and with a fine-point felt tipped pen, scribe a line on the underside of the plywood where it intersects the top of the hull. Repeat the procedure for the entire length of the hull, using different sheets of plywood as needed.
Once all lines are scribed, cut the plywood to the inside of these lines and about 6in. wide, on the side towards the centerline of the hull. Fasten the "lines" together, by reinforcing the plywood ends with strips of wood held in place with hot glue. Once all is lined up, sand the template smooth on its scribed line.
For the bow and stern stiffeners, use 1" x4" clear Douglas fir and for the rails use 1" x2" pieces. Lay the wood pieces flat, one atop the other, in order to get a close match to the templates and place scarf joints as needed. (BE CERTAIN that these boards are joined so that scribed contours leave sufficient thickness to do the job of stiffening the hull after they are sawn to the correct contour).
If you are lucky and the curving center section of your design is gentle enough, it should be possible to do the rails without templates, simply by bonding the wood directly to the hull without any scribing of lines or scarfing of joints: simply bend them into place and see how the hull looks: if it is fair, call it done and leave it at that. Just make certain that these side stiffeners mate with bow and stern stiffening sections in such a way that the bonded "whole" is stronger and more fair than the sum of these separate reinforcing "parts".
Lay the plywood templates atop the thicker scarfed wood pieces and transfer the scribed profile with a sharp pencil. Cut the wood to this line, then plane the edges to fit the varying bevel of each hull section. In the bow in particular, it's cut-and-try time and a fair amount of whittling will be needed for the wood to match the curves and fit flush with the top of the hull, with minimal gaps.
Place the formed wooden stiffeners where they will eventually be bonded to the hull and temporarily clamp them in place. With a pencil, draw a line about 1/8in. below the bottom edge of the wooden pieces, all along the inside edge of the hull (hint: hold the pencil flat against the bottom of the wood and the distance will be about right).
Remove the clamps and the wooden stiffeners, then apply masking tape to the inside of the hull at this line. Use the cheap 2" wide masking tape and lay it along the edge of old newspapers, so that half of the tape hangs off the edge of the page. Apply this edge to the tape that has already been applied inside the hull. This will protect the surface inside the hull from any squeeze-out when the wooden stiffeners are bonded in place.
Finally, bond the wooden pieces to the hull using resin and a filler of fiberglas matte. Hold all in place for curing, using clamps (don't overtighten the clamps, or you will sqeeze out the "glue" and the joint will fail). Since the bow is particularly curvy and not square, you might have to cut wedges and place them between clamp and hull for a secure clamping. Make sure these are at hand before catalyzing the resin!
When the assembly is fully cured, remove all the clamps and belt-sand all the lumps away. Now reinforce the bonded joint by applying a thin strip of fiberglas cloth to the underside of the joint of wood-and-hull. To ease the task and to get a better joint, first lay in a radius fillet of either microballoons or unidirectional fiberglas rope, mixed with catalyzed resin or; use an old teaspoon or a suitably fat finger to help form a nice curve. Once this has cured, sand off any lumps and cover this with 2" wide fiberglas tape, using a cheap 1-1/2" wide paintbrush to glop on resin as you go. Remember to trim the cured fiberglas from the inner edge of the wood stiffener before it becomes too hard and requires sanding.
If you plan to add a deck or cockpit coaming, proceed as with the previous operations, only using the inside edge of the hull stiffeners as your base line, rather than the hull itself (from here on it gets much easier, since the hull is now not nearly so floppy). Once you have decided on a cockpit size, use temporary cross-bracing to determine the fore and aft limits of the open space. Use the dimensions of these temporary cross-braces to make fore and aft deck supports out of wood pieces that are taller than those used on the sides, so that the tops of the boards can be sawn to a gentle curve. When a deck is applied to the top of curved supports, the strength of the structure will increase greatly and the boat will be more likely to shed water (and it looks prettier, too!). Once the bow bulkhead is in fiberglassed in place, attach a piece of twine to the tip of the bow and stretch it over the bulkhead. Using straightedge and measuring tape, figure out the contours of all other pieces that will be needed, in such a way that a conic section is formed when all the bulkheads are in place. It is important that the curve of the deck has a conic section, otherwise a plywood covering will not lay down well. For the aft deck, move the twine parallel to the centerline of the hull, so that it rides across the forward-most aft bulkhead and the curve at the top of the transome in parallel steps.
After the bulkheads are in place fore and aft, it is time to do the thin strip of deck that will run between hull and coaming, fore and aft. Get a long, straight-grained piece of wood, maybe 1"x2" and "spring" it lengthwise, to a contour that is pleasing to the eye. Now, clamp it fore and aft and measure along the bent wood, at about 1ft. intervals to determine the distance from it to the wooden hull stiffeners. Cut two blocks of wood (one for port and one for starboard) for each station, then cut two stringers to match the curve of the "spring". With the help of a friend or two and a pile of clamps, fiberglas all in place as before. If you think that these slender deck sections need reinforcement, catalyze a batch of resin and soak pieces of unidirectional roving in it. Lay one end of the roving over an intersection of the deck where support is desired, and let the other end descend to the deck. Where the roving hits the hull, splay the end of the fibers out to spread the load and to have good a good bond. When the resin has cured, use the Shurform and plane the top of the roving strands flush with the top of the deck supporting structure. Below are photos of various steps in deck manufacture.
| Photo #5: Looking aft, bulkheads are all in place and cockpit contours are being determined with a "spring" clamped to their tops |
Photo #6: Wetted roving has been draped to reinforce a slender section of deck. The top of
the roving has yet to be trimmed off. |
|
|
|
Photo #7: In addition to crown, a 1/4"x4" strip of marine ply was glued into notches let into the bow deck bulkheads, to strengthen the structure further. |
Photo #8: Close-up of fastening methods where the inner deck stringers meet the bow's aft bulkhead. Note the use of fitted reinforcing blocks to spread the area of the fiberglassed joint and hex head sheetmetal screws that held all in place while it cured. |
|
|
Interior Details
The real beauty of the fiberglas hull becomes apparent when one thinks one is finished and realizes something has been left out of the design! No problem: now that it's out of the mold it is possible to modify the hull to incorporate seats, bulkheads, hotwells, shaft logs, rudder posts or any other internal or external feature which, on a wooden construct would require foreknowledge of rib placement or extensive rebuilding with a careful regard to internal bracing. Whatever component you add to your fiberglas hull, the procedure has the same formula.
My boat is rather long and flat-bottomed, so I decided to add two stringers to stiffen the hull form fore-and-aft, which also act as a flat supporting platform for the boiler, engine and pumps. I also added two small dashboards, just aft of the engine and attached to opposite sides of the hull. The port-side dashboard holds a fathometer and compass; to starboard I have mmounted a speedometer. The procedure for attaching these diverse components is basically the same and can be done in a couple of afternoon's work.
Once the area to be modified is known, rough it a bit with #80 grit sandpaper, to remove the surface wax which floats atop surfacing resin when it cures. Sand until the surface feels dry, not waxy and sand the adjacent area about 2in. from the marked lines (use a pencil or a felt-tipped pen), all around.
Since most internal surfaces are curved, it is best to fix these contours in some way that can be transferred to a wooden part that is to be attached. For small parts and extreme curves, a long, fat piece of solder pressed up against the hull to make an impression. Carefully lift it out and lay it on the wooden piece and draw around the solder to get a cutting line. Once you have roughed out the shape on a bandsaw, the snug fit can be made by trial and error with a rasp and a bit of sanding. In case you want to add something particularly handsome like a piece of varnished mahogany, it is best to design so that the pretty piece screws to something else, like a piece of plywood that is fiberglassed in place. The trick here is to mount threaded inserts in the permanently attached bits of wood, so that mahogany pieces can be periodically removed for refinishing.
For longer parts, for instance the longerons that I wanted to have running lengthwise in the bilges, I made a template using dividers and pieces of cardboard or thin plywood, which can be stiffened temporarily with 2x4's held on with hot glue. First have a helper hold the cardboard in the approximate location. Then using your dividers, trace the contour from the hull onto the cardboard, with a sharp pencil. Cut the cardboard to the line, then use it for a cutting guide. Again. the resulting shape will only get you in the ballpark and the final fit will need a bit of patience. When working in places where the pieces to be attached will fall off if left to themselves, once they are cut to fit, use a few dabs of hot glue to temporarily attach them to the hull.
Next, carefully cut pieces of fiberglas cloth so that they will overlap and completely cover the wooden additions. Plan on making a fillet of microballoons and resin to provide a gentle radius in all corners to be covered. Catalyze a small tub of resin, mix it up good, then pour in the microballoons until the mixture is stiff enough that it will not run and apply this as needed. A couple of tricks here: the brown microballoons you get at hobby shops are coarser than the white ones available from marine supply houses. Each has its advantages, so experiment a bit before committing to one or the other. Use a small spoon to form the curve of the fillet; keep a cup of acetone or vinegar nearby and clean the spoon frequently to prevent goop from sticking to it and ruining the contour. Don't worry about perfection: the cloth will cover any small mistakes.
When the fillet has cured so it can be sanded without being dislodged (about an hour after it has "kicked off") you can apply fiberglas cloth. Keep a disposable 2in. paintbrush handy while you mix up a "slow batch" of resin, i.e. one with less than the normal amount of catalyst, to increase the cure time. Brush some of it onto the fillet, the 2in. sanded perimeter and the wooden attachment. Only do one side at a time, or as much as is covered by each piece of precut cloth. Apply the dry fiberglas cloth to the wet surface and maneuver it into position. Get more resin on the brush and glop it on the cloth to wet it out. With the brush, use a "dab and swipe" motion to force out as many trapped air bubbles as possible and to nudge the cloth into the best position (don't forget to wear disposable latex gloves: this is a gooey business!). Now repeat this procedure to any other areas to be covered and try to get them all done with the one batch of resin before it starts to cure: this will allow you to maneuver overlapping cloth pieces, eliminating wrinkles as much as possible.
When you are all done and the resin has just started to cure enough that it feels rubbery rather than sticky, remove the masking tape perimeter and wait for full cure. Since this saturation of cloth is done with laminating resin, even when it cures it will seem a bit tacky, so any smoothing must be done with a razor blade or a Shurform, since sandpaper would quickly clog. Once smoothing is done to your satisfaction, brush a coat of surfacing resin over everything and let this cure overnight. Next day, you can sand or wet-sand as you see fit, with 360 grit.
The propeller shaft log:
This is a special case, but its manufacture is simpler than one might at first assume. Whereas it is possible to get one off the shelf, it's kinda fun to make one, once you know how. All you do is find an old fluorescent bulb and wrap it with fiberglas cloth that has first been brushed with polyester resin. When the desired outer dimensions have been reached, stop wrapping. It is a good idea to build up the inner end of the shaft log a bit further, using a 1/4" wide strip of cloth, in order to provide a lip, so that the packing gland hose clamp will have a tendency to stay put. When the resin has cured, tape both ends shut, then grab the shaft log and give it a sharp whack against something hard. The fluorescent bulb will shatter and when the tape is removed, the debris can be shaken out into the trash.
The shaft log is also special in that it must be carefully aligned with the centerline of the hull and it must be inclined from the horizontal in order for the propeller to clear the bottom of the hull. But otherwise, the same techniques are used to bond the log to the hull. Below are photos of the jigs I used to make certain all went well. The plywood piece fitted between the shaft log and the hull, is cut to the angle that was necessary for my propeller. Onto this I drew a sketch of the skeg that would support the outboard end, in order to determine the size and probable location of an interior supporting piece of plywood that would be laminated into the hull at a later date. So that the first jig wouldn't fall out, the outboard end of the shaft log is hung off of the stern, using a round block of wood inside its end, with a nail to fasten it to a vertical support that hangs off of the top of the transom.
|
Photo #9: Strut mock-up alignment piece and outer end shaft log supporting piece, hanging from the transom. |
Photo #10: Fiberglas lay-up to bond shaft log to hull. A tight-fitting through-hole in the hull and masking tape below the hull assured there wouldn't be a drippy mess. |
|
|
--Well, there it is! Since there is a fair amount of woodwork involved despite the fact that this is a fiberglas boat, I suggest that those interested in the "quick and dirty"approach to boat building should take a look at books by Harold "Dynamite" Payson. Two magazines worth reading are Boatbuilding and, of course, Wooden Boat in particular, which has the occasional well-written and well-illustrated article on boat building. The finer points of the process are always applicable, regardless of the hull material you choose.
If you should take a liking to my boat, be aware that the mold is malingering in my back yard and it is up for grabs. Time and tide have kept me from making more of them, but it would be fun to see more of them on the water!
Return to Articles Page
Return to Boat Stuff
Return to Boat-building Page
Return to S/L Pegasus