A Modified Sherline Rotary Table

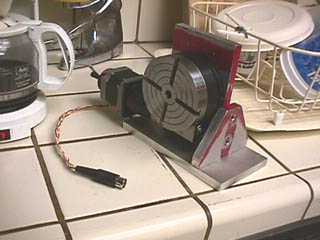
Some time ago I had the extreme good fortune to get my hands on the second production unit of Sherline's cnc rotary table. I got to "beta test" it for six months and change. It came equipped with a little stepper motor attached and with a separate programmable motor controller. This is an extremely neat device and it shows no sign of the backlash that was evident in the one that I saw at WESTEC. I have also been informed that since I got my unit, many refinements have been incorporated into the design. I suspect that anyone who buys one today will find that many other improvements are now included.

The cnc controller itself was designed and built by my pal Bryan Mumford who, among his other accomplishments, is an expert at all things electronic. His end of the project has gone quite smoothly: even before I had a chance to test the device thoroughly he had already revised the software and sent me an updated ROM chip (a third iteration is now available directly from Sherline and I plan to pop it in as soon as it arrives). As far as I can tell the device is without flaw, at least in terms of the part Bryan had done for it.

The controller can accept data as degrees, individual steps or divisions of a circle, so a great variety of tasks can be performed. I'll do most of my work with divisions of a circle but it's not hard to imagine situations that call for other entries...

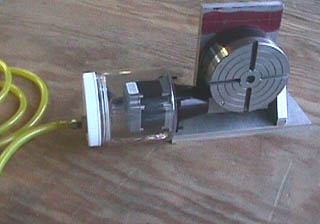
Mechanically there were some shortcomings in this early unit and in one or two of the accessories offered in the catalog appear to be wimpier that I would prefer: mounting screws are #10, rather than 1/4 in, for instance. But when one considers that the unit does for hundreds of dollars what other brands do for thousands, It's a bargain! A little sweat equity is all that is needed to set the thing to rights. Following are text and photos of what I have done to modify my early prototype into something that satisfies me.


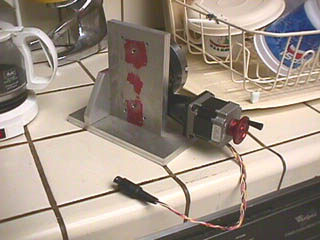
--Sherline offers a vertical mounting fixture but it struck me as a bit flimsy. Since I had the materials to hand I decided to make my own.

Photo #1: Front Left view. My version is still doused with Dy-Kem and a long way from pretty, but it's a start. All the components are made of 1/2" aluminum flat bar. Except for the 3: #10-32 screws that had to be used to fasten the rotary table to the vertical mounting plate, all fasteners are 1/4"-20 stainless SHCS. By placing this vertical support on the center line of the base plate the rotary table has no tendency to tip over. I'll trim the height of the vertical support later...
Photo #2: Front Right view. Note that the vertical mounting plate is reinforced with a piece that goes right across the base plate. On the Sherline version this stiffener is located behind the vertical plate and only fastens across half the width of the base plate. Note also the short motor cable; don't worry: a 6-ft extension cord is also supplied.
Photo #3: Rear view. Note how the unprotected braided cable enters the motor housing: it's not waterproof or chip proof (Sherline says the motors are made this way and there's nothing they can do about it). A bit of hot glue would fix this well enough for benchtop machine use. Newer models have improved chip resistance at least, with a shielding wrap around the wire bundle...
Photo #4: Front view. I fastened the rotary table to the vertical plate with the bottom of the motor 3/8" above the base plate. I plan to run the unit in extremely sloppy environments and this gives me room to seal the motor and handwheel in a case of some sort. A "bulkhead" fitting with a hose barb will attach to the end of the case and the wiring harness extension cord will run through flexible tubing that jams onto this fitting. This way I'll be able to make chips with spray mist or flood coolant going full blast.
Photo #5: Here's that waterproof housing. It's a 2-1/2 cup wide mouth plastic jar from the kitchen department of a hardware store. The bottom was dished, but by sequentially tightening the four motor mounting screws I was able to flatten the jar's bottom without cracking it. I did shatter a chunk out of the lid when I drilled a 5/8" hole in it, but I patched it with RTV. The hole in the lid gets a bulkhead fitting/hose barb, and the yellow plastic tubing attaches to this. Five wires must fit through this, but with a little patience it can be done.
Photo #5: Note that I removed the hand crank in order to make room for the plug. I'll probably snip this off and solder up the extension cord, so that there will be a bit more room inside the jar. I would have bought a taller jar, but there weren't any to be found.

Thanks to the timely intervention of my pal Roger McGuire I no longer need to add a bump switch to the top of the unit. The rotary table can now be activated with an M-code command through the programmable controller on my benchtop cnc.

If this sounds like a neat widget you can't do without, follow this link to the HUGE on-line tutorial about the new improved Sherline cnc Rotary Table.

Return to Jigs, Fixtures and Shop Hacks