Production Hacks

For those who have not done any production machining it is important to know that seconds count. It all comes down to time and motion; i.e. how long does it take:

 For onesy-twoseys this isn't important, but when you need to do dozens or hundreds of something the difference of a few seconds here and there can add up to real money! Think about it: if you price a job at, say $80/hour that means you're making slightly more than a dollar a minute. Very roughly that works out to about $.02/second. If I can shave ten seconds off of the time it takes to make each of, say, 1,000 parts, that's $200 in my pocket.

 Little things matter; how far you have to walk to reach for a blank, how far to drop off a machined part, how long to grab an air gun, how long to hang it back up, how often you have to wipe your hands on a rag, etc. Drop a part? You'll probably drop more. Don't bother picking them up until the job is done, then doing it once saves a boatload of time.

 Following are examples of parts I'm making for various clients and the things I've done to speed up operations.


Photo #1: Instead of spending a minute to move the quill stop up or down I sawed open a couple of different lengths of pipe. Now I can limit travel in 1" increments. These can also be a handy way to limit quill return, by putting a split pipe on the bottom, rather than the top of the seat.

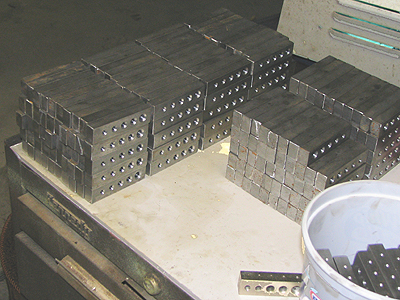
Big job for Vern: 300 parts, each one gets drilled 15 times and tapped 5 different sizes! The profit margin is slim, so I'm doing my best to cut out as many seconds as I can from each operation.

Photo #2: First 5 holes drilled and chamfered in each of 300 parts. CNC drilling/chamfering cycle plus a part flip to chamfer the back side adds up to about 3.5min/part. The trick is to be there when the cycle ends and to change the part before the machine can change bits. Tedium, tedium...
Keeping (heavy!) parts on a rolley-cart makes moving them to the next op easier. Special cases go in the tupperware (Good old Cool Whip!) to keep 'em seperate from the others. These were early parts from when we were still tweaking the program. They'll be re-run to increase chamfer depth, but only after all the others are done, so I can begin second operation on another machine while the first op is finishing on the first machine.
Photo #3: Eventually each part gets 5 tapped holes, all different sizes. That means opening and closing the vise 1,500 times!! I bought a used pneumatic vise, then made a fixture plate that could be quickly clamped in the standard mill vise. I've milled a nest into the pneumatic vise jaws, so no seperate stop rod is required to locate the part in the X-axis. With spray mist coolant and a Tapmatic I get cycle time down to less than 10 seconds per hole per part; i.e. 4hrs, 10 minutes (plus a few minutes to change taps and move setup in X axis) to do all 5 holes in 300 parts if I don't stop and if I don't go nuts...

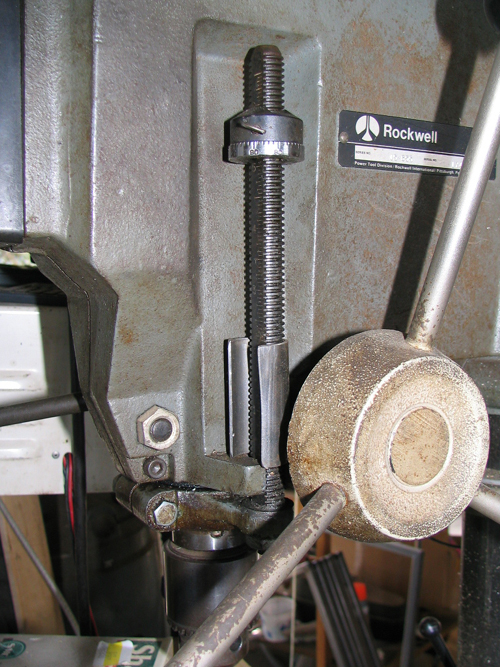
March, '06: I found myself in a situation where I had to tap both ends of a bunch of stainless steel rods on the drillpress. The holding fixture took up most of the drillpress table and the vibration would have made the oil cup and brush fall off of the aluminum plate.

Photo #3: Solution: put a super magnet in the bottom of the cup and secure it to the last available bit of iron real estate.
Photo #4: Adjusting the little threaded depth stop gets tedious, so cut bits of 1/16" wall steel pipe into 1, 2 and 3in. lengths. I cut slots in them, then slip the length I need over the threaded shaft, eliminating a pile of time and hassle.

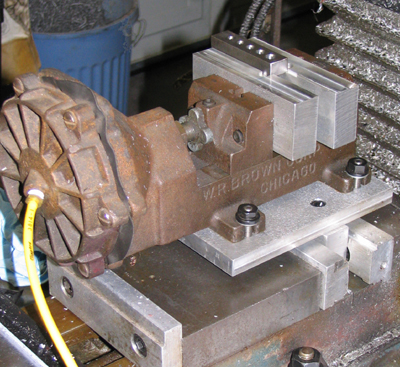
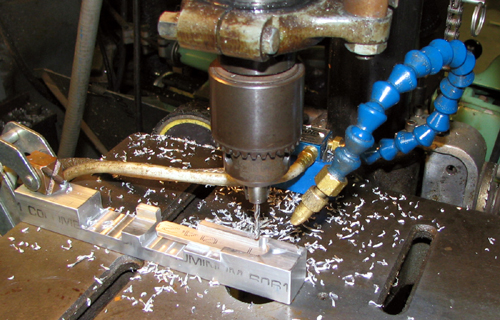
At present I'm making sensor mounting hardware for Bryan Mumford's Clock Timers. Previously I'd done this particular operation on a milling machine, which included opening and closing a vise and blowing away chips each cycle. I made this jig to speed drilling of #29 holes in the ends of short lengths of 1/8 in x 1/2 in aluminum. It eliminates the need to tie up a milling machine, it does away with tedious opening/closing cycles with a mill vise and it also eliminates the need to grab an air gun and blow chips out of the area. With this jig clamped to the drillpress table and with the spray mist carefully positioned to lubricate the part and to blow chips away, I save 15 seconds per part.

Photo #3: View from left side. The whole thing was whittled from one hunk of 1in. square aluminum bar. Note position of spraymist nozzle to lube the drilling operation, but to also blow chips thru the short channel and off the area supporting the workpiece. Pieces are loaded/unloaded with the left hand, so right hand is free to work the quill handle.
Photo #4: Front view. Note two milled cutouts and two "lands", one covered by a short blank. There are three different lengths of work that use the jig; the longest bridges the right hand gap and lays atop both lands. The cutouts give chips a place to go and provide a place for my fingers, making it easier to hold and remove parts.
Photo #5: Closeup of the business end of the jig. The workpieces have rounded ends, but they aren't quite semicircular. To be sure the part's "corners" don't interfere with the semicircle at the right end of the jig I've milled a 3/16" wide clearance slot part way across the Y axis.


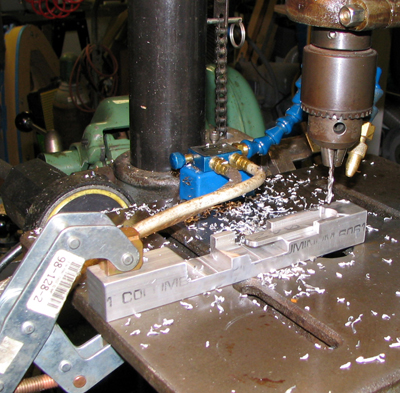
One of the parts I've been making for Bryan gets a looong slot that needs to be deburred. Holding the part lengthwise between thumb and middle finger was the real challenge: it was difficult and dangerous. This fixture is a surrogate hand to safely grip the part for this operation (I've plopped a finished, anodized part on the jig for clarity). This simple contraption saves me 20 seconds per part.

Photo #6: The part measures 1/2" wide, 1/8" thick and 5" long; the slot is 3/16" wide and 4" long. The part nests in a 1/8" deep groove that's a lot longer and a little wider than the part. A relief channel cut beneath the slot area gives clearance for the snout of a Rout-a-Burr. To fasten the part securely I rotate a Mitee Bite Fixture Clamp (basically a cam) on the left. This pushes a little aluminum slider against the left end of the part, gripping it much more tightly than I ever could by hand. After deburring and loosening the cam, the hex key doubles as a hook to remove the part from the holder.

Return to Jigs, Fixtures and Shop Hacks
Return to Works In Progress
Return to Shop Stuff
Return to "Steamboat Ed" Haas