Steamboating is an inexact science. Because of this, it is traditional to have at least two means of supplying water to a boiler, in case one should fail. In my boat, the primary feed pump is a Hypro piston pump. In this design the check valves, that make water flow in one direction only through the pump, are two stamped stainless steel disks which are pushed against their seats with springs. And thereby hangs a tale...
My secondary is a hand pump which uses stainless steel balls and brass seats. To make sure water isn't pushed backwards by steam pressure there is a check valve "downstream" from the outlet. The force needed to push water by hand into a boiler at 140psi is not trivial however and the best I can hope to do with this pump is to maintain water in the glass when the boat is tied up at the dock and the damper doors are closed. If I am under weigh, the hand pump can help adjust the water level upwards a bit, but really most of the work is done by the primary.
In 1996, through some mis-chance I wound up with a situation involving contaminated feedwater. The culprit was steam oil which had somehow passed through the fluffy polypropylene filter media, then under one dam and over another, then worked its way through a strainer and finally flowed on through a heat exchanger and into the primary feedpump. The sticky mixture of lukewarm steam oil and feedwater congealed on the stainless valve disks and prevented proper seating. It was possible to feel the effects of this, by placing an un-gloved hand on the copper tubes running not only between the feedpump and the boiler but also from the hotwell to the feedpump: the tubes quickly became too hot to touch: a bad sign!
Subsequent disassembly and cleaning of the feedpump and replacement of the filter media only helped for a few minutes of additional steaming, before the condition reappeared, indicating to me that oil had again migrated throughout the plumbing. To rectify things, I would need to replace all of the copper tubing that could be reached and I had to thoroughly clean the inside of the pumps and the pressure vessel by repeatedly dosing feedwater with trisodium phospate (TSP), then raising steam, then blowing down.
I have since taken several steps in order to minimize the likelihood of something similar happening:
For starters, I switched over to a non-condensing setup. This has several advantages and one big disadvantage. First the bad news: it is possible to suck up a hunk of something that will clog the intake. To minimize this possibility, I am considering installing a tee-shaped intake scoop, i.e. one that is open fore and aft: should the forward end become clogged, it should still continue to pick up water from the other end. At present the intake is just a forward-pointing elbow that hangs beneath the hull. I have added a screen to the front so that nothing monstrous gets sucked in, but there is still the possibility that the intake can be clogged by a bit of flotsam. The good news is that this change let me take off the keel condenser, a move which made the boat move through the water a bit more easily, reducing the load on the steam engine and boiler accordingly. At present the exhaust, which used to go first to the heat exchanger and then to the keel condenser, has been spliced into the pipe that handles bilge water discharged from the ejector. Eventually I plan to vent my exhaust up the stack, to create an awesome vacuum above the fire. This would help to "pull" the flames up closer to the water tubes, increasing the heat transfer and generating more steam.
Another change yet to be implemented will be the addition of a steam feed pump, which will become the new secondary, thus bumping the hand pump down to tertiary status. A few years back at the Owls Head Transportation Museum Auction I acquired, sight un-seen "a well presented and nicely made working model of a Worthington Duplex Steam Feed Pump". Well presented, yes; nicely made? No...
Upon closer examination it had more than a few problems and I have spent the better part of a year's worth of spare time trying to track them down. The scale of the model is about 1/2 to 1/3. Upon removal from its pedestal mount, I found the name "Breisch" cast into the base. So far I have been unable to locate more castings from the Breisch estate, or from the fellow who has acquired the patterns for the Breisch line of steam engines, so basically I am on my own in terms of spare parts.
The Breisch pump's dimensions, etc. are as follows:
L x W x H:12" x 4-1/2" x 6" (including aluminum base plate)
Weight:approx. 20 lbs.
Bore of steam cylinders:1-1/4"
Bore of pump cylinders:1"
Stroke: 1-1/2"
At 50 strokes per minute it pumps one gal/min at 1-1/2 times the steam pressure.
A (partial) list of its problems:
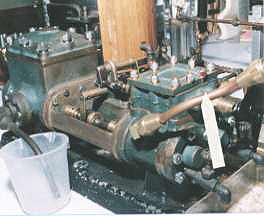
There were no studs anywhere on the feed pump when I got it: all fasteners were hex head and of more or less random length. I made new #10-32 studs and stainless hex nuts for the feedpump top cover and I made a "matching" set of #6-32 hardware for the valve cover on the steam end, but no amount of repair can hide the ugly break-out in the above photo. I finally found a source for the bronze castings in their raw state and if I ever get the time I'll machine a complete one up myself...
In a trial steaming, the pump moved easily, but the timing seems to be off, even though I set it carefully "by the book" (not a difficult task). I suspected that the problem lay in the excessive slop between the D-valves and the coupling nuts that ride in slots on their tops. At one time I showed the old D-valves to Todd Guldenbrein who noticed what I had not: the steam passages on the two D-valves weren't the same size! I next re-made these nuts, making the new ones thicker, to minimize the clearance. I made certain that the steam passages were the correct size and that the lands around them were adequate as well. Once these were fitted I took a whack at steaming up the pump again and behold! It works!!.
The pump doesn't deliver much water and I put this problem down to the crummy, scored steam pistons and the bad rings. I hope that once these items are re-made the pump will work good enough to be installed in my steamboat and to begin earning its keep.
Castings for what is an excellent pump, if built by a competent person can be had from Clarence Meyers, care of:
Myers Model Engine Works
15929 Five Point Road
Perrysburg, OH 43551
The very reasonable cost of the castings is $165.- and I plan to get a set post haste.