Art Car Progress: August, '05

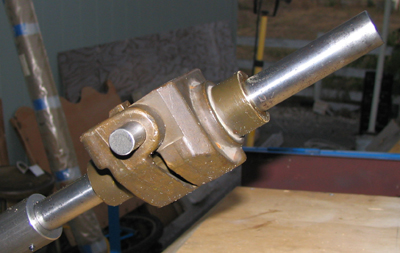
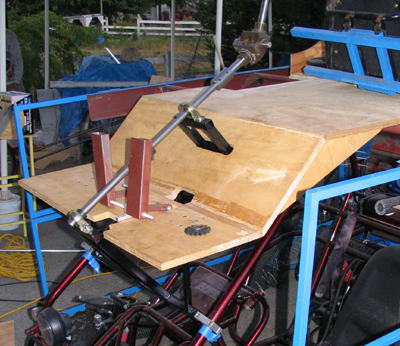
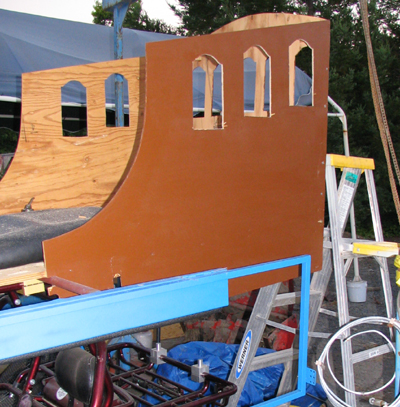
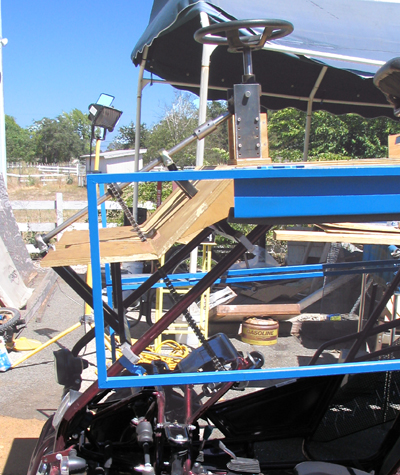
Well here I am with less than a month to go and I'm getting slightly optimistic despite the pile of stuff that still needs to be done. Don came to visit last weekend and many details were finished thanks to him. Cabin sides have been reinforced at the corners. There's a neat cut-out mid-deck to permit folks to board, provided they're not too porky! There's now a definite plan and a position for the upper steering apparatus; the two of us fabricated a combination wood and steel mount for a very neat bit of tackle I found at the junkyard. This will allow us to tilt the steering wheel to any position, making it easier to assume the driving position or exit from same. This last bit is one of the neatest things I've seen in a long time and it's in the first three photos. It's called a Gear Universal Joint and it's available retail from McMaster-Carr (on p.957 of their catalog) for a whopping $300.-!! The good news is they can be found inside larger outboard motors: it's the widget that allows the twisting throttle arm to be tilted relative to the engine, so they're not all that uncommon and should be available surplus.

Chris N. has also paid a visit and, after much consternation we've decided that it's easier to drop a 12-v battery's output to 6v to run various bits of electronic gear than it is to bump a 6v battery's output up to 12v to start the engine. I'm going to replace the dead Chinese 12-v battery that came with the kart with a small but reliable Diehard. This means I'll have to enlarge the battery tray area behind the main "cabin", but that's easily done (I think...).


Photo #1: Looks like a rather beefy, but straight shaft coupler, yes? But wait, there's more!
Photo #2: Bend the top shaft and voila! the assembly still works. Any shaft angle between 180 and 90 deg. is possible, with good tight control throughout that range.
Photo #3: Shafts bent to 90 degrees and top shaft tilted to starboard and the innards are revealed. The thing consists of two massive bronze housings joined by short steel pins. From the junkyard the shafts were so badly pitted that when I was done cleaning them up they measured 15/16" diameter. The grease fittings were clogged and the bearing seats within the bronze castings were badly galled. But it didn't take two hours before I had put the whole thing to rights. It's very well designed and includes chucking pieces, in the form of the protruding shaft collars so it was a simple matter to turn down the bearing seats. Now it runs like a dream.
Photo #4:Here's a shot of the whole upper steering column. Lower and upper steering column bearing mounting struts are painted black. The rust colored bits in the middle are the gas and brake pedals which are only there to give us an idea of what their final positions might be. They'll be permanently mounted after a bit more welding. The blue "H"-shaped thing to the right is the now-painted seat mount which still needs work, as the seat still topples over backwards when unoccupied.
Photo #5: More of Don's handiwork: the Cap'n's cabin's view astern is enhanced with views to either side. Cutouts and edges will eventually be adorned with EL wire.
Photo #6: Woohoo! After much preparation the upper steering column and the lower one are at last coupled together with #40 roller chain. Top steering wheel on order; hope to have it installed in a week or so. Here the lower steering wheel is just balanced atop the shaft coupling, to give us an idea of how driving will look.
Photo #6: Side view showing the relative locations of the two shafts and the tackle used to connect the dots. The two top shaft bearings float in their housings until they're bolted in place. This style of bearing really minimizes any binding from misalignment.

Next project: upper gas and brake pedals and linkages to lower pedals. More photos in a couple of days; stay tuned!


Return to the Art Car Project
Return to  Steamboat Ed  Haas
Please send feedback to: "Steamboat Ed" Haas